Vertical solar panels on a south-facing wall produce roughly 290 kWh/year per 400W panel in the UK, about 30% less than an optimal roof mount, but more than enough when your roof is full, shaded, or the wrong orientation. I have installed two wall systems. The first failed on the mechanical side and I took it down. The second has been running and the data is below.
How to Mount Solar Panels on a Wall
Vertical solar panels on a south-facing wall produce around 290 kWh/year per 400W panel in the UK, about 70% of an optimally tilted roof panel. Wall panels produce more in winter (low sun hits the 90° face directly) and less in summer. They are permitted development in most UK properties as long as they protrude less than 200mm from the wall.
It is tempting to drill through the panel frame and bolt it straight to the brickwork. The problem is that solar panel frames are not designed for that. They are made to sit in clamps that grip the outer edge — the aluminium is thin enough that drill holes become stress points, and the frame was never engineered to support 21 kg of dead weight hanging vertically from two or three bolts. You also trap moisture behind the panel with no airflow to keep the cells cool, and leave nowhere to run the DC cables tidily.
A proper mounting system solves all of these at once. For roof-mounted systems, our roof mounting guide covers rails and hooks in detail. Rails or brackets spread the load across multiple fixing points, hold the panel away from the wall so air can circulate, give you a channel for cable management, and — critically — let you level and adjust the panel after the fixings are in. There are two main approaches: purpose-built wall brackets (easier, more expensive) and Unistrut rail systems (cheaper, more flexible). Both work well. Here is what I have learned from using both.
Specialised Wall Brackets
Purpose-built solar wall brackets cost more per panel but offer built-in angle adjustment. You can tilt the panel away from the wall to find a better angle — reducing the tilt from 90° to 80° adds roughly 40 kWh per year per panel.
| Tilt Angle | 90° (flat against wall) | 80° (tilted 10°) |
|---|---|---|
| PV installed [Wp] | 400 | 400 |
| Yearly PV energy production [kWh] | 291.86 | 330.35 |
For reference, the optimal tilt angle in the UK is around 35–40°. Dedicated brackets let you get closer to this, but remember the 200 mm protrusion limit under permitted development.
Unistrut Rail System (The DIY Favourite)
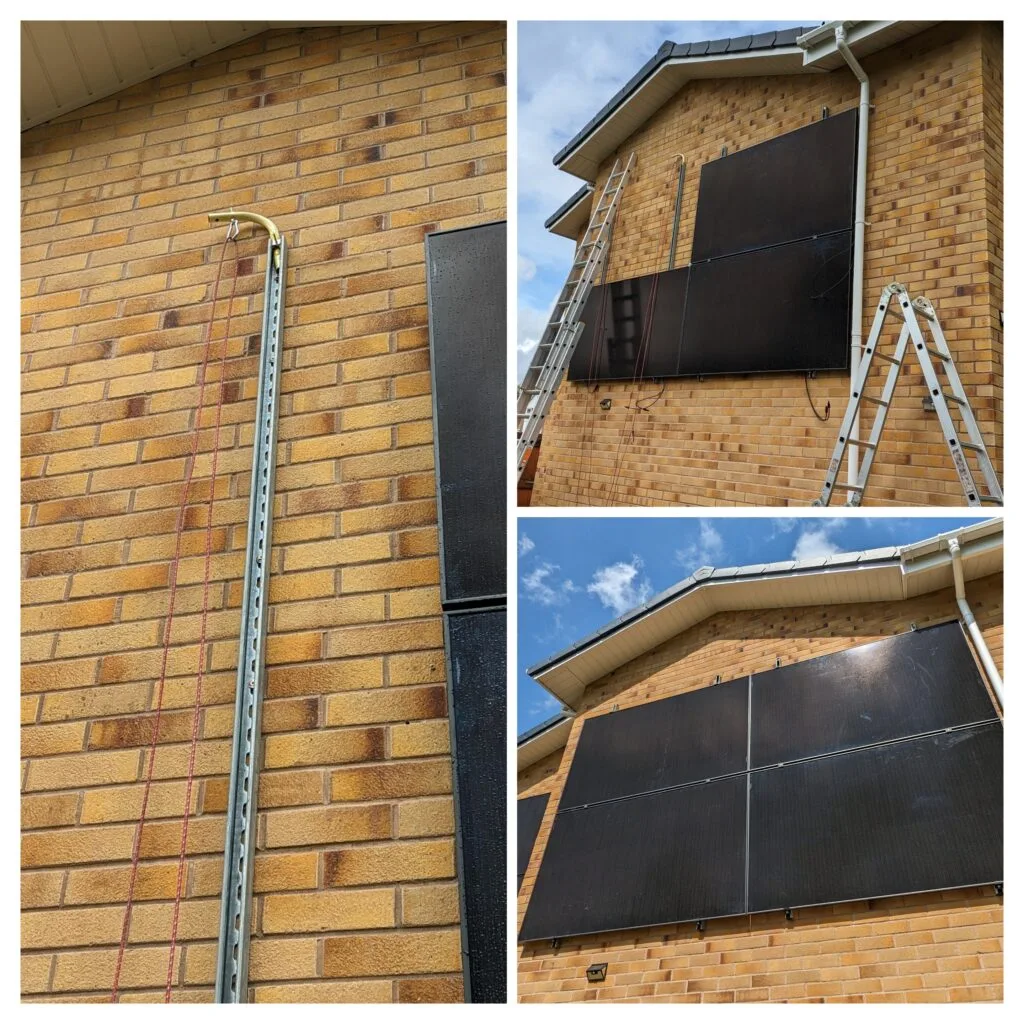
Unistrut rails are the approach I recommend for most DIY wall mounts. They are strong steel channels with prefabricated grooves on the inside for clamping. You can buy them from any electrical wholesaler. The rails bolt to the wall with coach bolts or chemical anchors, and solar panel clamps slide into the grooves.

Clamps and Fixings
Solar panel clamps for Unistrut come in end-clamp and mid-clamp variants. Unlike some roof rail systems, Unistrut end clamps and mid clamps are not interchangeable. We used Fastensol clamps with M8 Unistrut spring nuts — around £1.50 per clamp. Example links:

Preventing Vertical Slip
Gravity will try to pull wall-mounted panels downward. The Unistrut spring nut design handles this: the serrated face of the nut bites into the channel groove, making vertical slip nearly impossible once tightened. This is a genuine advantage over smooth-channel rail systems.


Typical Cost Breakdown
Wall mounting is slightly more expensive than a standard roof mount because of the heavier fixings and the need for scaffold access. Here is a rough guide for a four-panel wall installation in 2026:
| Item | Approximate Cost |
|---|---|
| 4 x 400 W solar panels | £300–£500 |
| Unistrut rails (2 x 3 m lengths) | £40–£60 |
| Clamps, spring nuts, coach bolts | £30–£50 |
| Chemical anchors / heavy-duty fixings | £20–£30 |
| Scaffolding tower hire (1 week) | £150–£200 |
| Cable, connectors, trunking | £30–£50 |
| Total (panels + mounting, excl. inverter) | £570–£890 |
If you already own an inverter with a spare MPPT input, the wall mount adds very little to your system cost. The panels themselves are the biggest expense, and panel prices have dropped significantly in recent years.
Working at Heights Safely
Wall mounting is a two-person job. Panels are awkward to lift and position, and you will be working above head height. The HSE Work at Height regulations apply even to DIY work on your own property.
Hire a scaffolding tower rather than relying on ladders. You can rent one for under £200 per week, delivered and collected. A tower gives you a stable platform to drill, lift panels, and tighten fixings safely. Most vendors deliver scaffolding to your door, and a single tower takes about 30 minutes to assemble.
Real-World Results: Two Wall-Mount Projects
Before diving into regulations and hardware, here is what actually happened when I installed wall-mounted panels on two different properties.
The Successful Wall-Mounted System
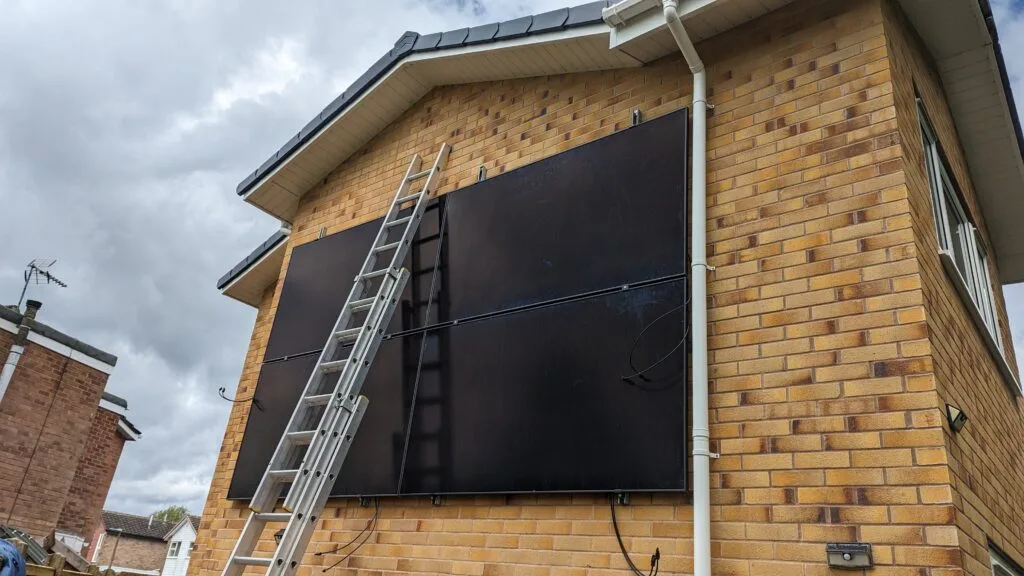
Our first wall-mounted installation comprised four panels in landscape mode, fixed to the south-facing wall of a house surrounded by tall trees. The roof was too shaded to be reliable, so the wall was the obvious alternative. We used Unistrut rails bolted directly to the brickwork.
This system is still generating well. The vertical angle means it captures more energy in winter when the sun is low, and less in summer when roof panels do the heavy lifting. The panels stay cleaner than roof-mounted ones because rain washes them naturally and dirt does not settle as easily on a near-vertical surface.
The Unsuccessful Vertical Panel
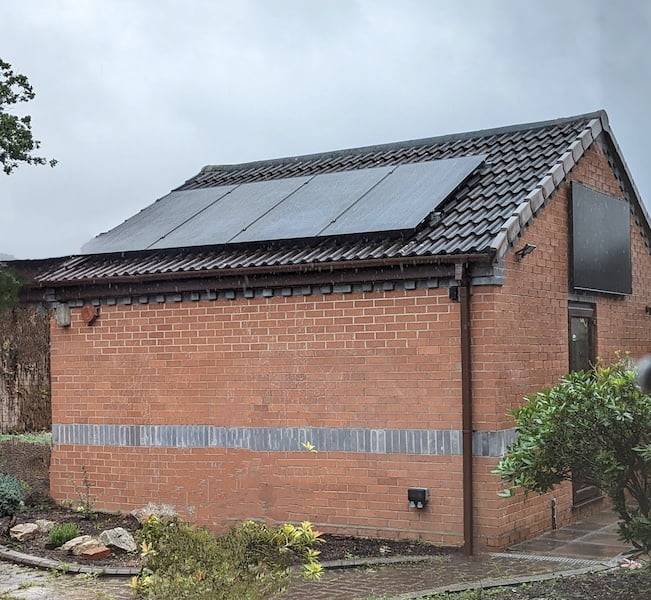
Encouraged by that success, I added a single vertical panel to my own four-panel roof array. The wall faced south-southwest, but the roof string it was connected to pointed west-northwest. The mismatch in generation patterns caused the entire string to underperform.

I tried fitting solar panel optimisers to compensate. Unfortunately the orientation difference was too large — at any given time, either the wall panel or the roof panels sat in deep shade from a nearby building. The optimisers could not bridge a gap that wide. I eventually moved the panel to the roof.
The lesson: always give a wall panel its own MPPT input on the inverter, or use a microinverter. Never mix a wall panel into a string that faces a different direction.
Advantages of Wall-Mounted Solar Panels
Better Winter Performance
The UK sun sits low in the sky from October to March. A roof panel tilted at 30–40° is optimised for summer, but a near-vertical wall panel catches low-angle winter light far more effectively. The further north you are, the more pronounced this benefit becomes. Since UK electricity demand peaks in winter, wall panels produce energy exactly when you need it most.

Use Space Your Roof Cannot Offer
Not every roof is suitable: it may be too old, have an awkward structure, be covered in dormer windows, or face north. Walls open up surfaces that would otherwise go unused. A south or south-west facing gable end can accommodate two to four full-size panels without touching the roof at all. This is also useful if you plan to re-roof in a few years and do not want to remove and reinstall panels.
Self-Cleaning and Low Maintenance
Vertical panels shed dust, pollen, and bird droppings far more readily than angled roof panels. Rain washes them clean naturally. Over the years, roof panels can lose 5–10% of their output to soiling if not cleaned — wall panels rarely have this problem. Research from the Renewable Energy journal confirms that vertical and near-vertical orientations significantly reduce soiling losses.
Complementing a Roof Array
If you already have a roof system, wall panels even out your generation curve across the year. Roof panels dominate in summer; wall panels contribute more in winter. This combination can reduce your reliance on grid imports during the expensive winter months and improve your overall payback. In overpaneling scenarios — where you install more panel capacity than your inverter rating — wall panels on a separate MPPT string give you extra winter harvest without clipping summer output, since they naturally produce less in peak summer.
Planning Permission and Building Regulations
In England and Wales, installing solar panels on a house is classed as permitted development. You do not need planning permission provided you meet a few conditions:
- The panel must not protrude more than 200 mm from the wall surface.
- No part of the installation should sit above the highest point of the roof (excluding the chimney).
- Panels must not be fitted to a wall fronting a highway if the property is in a conservation area or World Heritage Site.
- Do not install on a listed building or scheduled monument without specific consent.
The Planning Portal’s detailed requirements page covers edge cases. Scotland and Northern Ireland have similar rules but check with your local authority to confirm. The full legal text is in Part 14 of the General Permitted Development Order 2015. Always verify with your local authority before you start drilling.
Structural and Weight Considerations
A typical 400 W residential panel weighs 20–22 kg. Add 3–5 kg for the mounting rails and fixings, and you are looking at roughly 25 kg per panel on the wall. For a solid brick or block wall in reasonable condition, this is well within tolerance — a wall-mounted TV bracket carries a similar load. For cavity walls, you need fixings that reach the inner leaf. For older walls or those with known structural issues, consult a structural engineer before installing. The LABC guide to retrofitting solar panels covers the structural checks in detail. The HSE guidance on solar panel installation also covers structural assessment considerations.
Check before you drill
- Article 4 direction check. Use the planning portal LPA finder to see if your street falls under an Article 4 direction. These remove permitted development rights (common in conservation areas, Bath, Hackney, Bristol, York and many market towns). Getting this wrong means a retrospective planning application or removal.
- 200mm protrusion rule. Under UK permitted development, the panel and bracket combined must not protrude more than 200mm from the outermost surface: render, brick face, or cladding. Measure from there, not from the batten line. If in doubt, fit a flatter bracket or drop the panel closer to the wall.
- DNO notification timeline. Any grid-tied addition needs a G98 or G99 notification to your DNO. Below 3.68 kW per phase is G98 (self-certify with 28 days’ notice after commissioning). Above, or three-phase, is G99 (full application, can take weeks). Full DNO registration walk-through. This is not optional.
Wall vs Roof: When Does Wall Mounting Make Sense?
Wall mounting is not a replacement for a good south-facing roof. At the optimal 35–40° tilt, a roof panel produces roughly 400–420 kWh per year versus 290 kWh for a vertical wall panel (both 400 W, south-facing, UK average). That is about 30% less annual output.
However, wall mounting is the better choice when:
- Your roof is unsuitable — north-facing, heavily shaded, too old, or structurally weak.
- Your roof is already full — wall panels let you expand without a second inverter by using a spare MPPT channel.
- You want better winter output — a mix of roof and wall panels smooths your generation curve across the year.
- You plan to re-roof soon — wall panels stay in place while you repair or replace the roof covering.
- You are overpaneling — adding wall panels on a separate MPPT gives you extra winter capacity without clipping summer generation from the roof panels.
Solar Panels on Fences and Boundary Walls
Mounting panels on garden fences and boundary walls is growing in popularity as panel prices continue to fall. A south-facing fence run can host several panels in landscape orientation, turning dead space into a useful energy source.

The same permitted development rules apply to fences and boundary walls as to house walls, with one additional consideration: fences are more exposed to wind, debris, and accidental damage (vehicles, footballs, falling branches). A flimsy fence panel will not support a 20 kg solar panel in a gust.
What to Check Before Fence Mounting
- Post strength: The fence posts, not the panels between them, carry the load. Concrete or thick timber posts (100 mm+) are best. Standard 75 mm timber posts may need reinforcement.
- Wind loading: Fences catch more wind than house walls. Vertical panels act like sails. In exposed locations, consider whether the fence can handle the additional wind load (BS EN 1991-1-4). Secure the panels at both top and bottom rails.
- Boundary rules: If the fence sits on or near a boundary, check that your panels do not overhang your neighbour’s land. A friendly conversation with neighbours before installation avoids disputes later.
- Cable routing: You will need to run DC cable from the fence panels back to your inverter. Bury the cable in conduit or run it along the fence line in UV-rated trunking (see our solar cable connectors guide for DC wiring standards). Follow DNO notification requirements for any additional capacity.
Bifacial panels are worth considering for fence installations. A light-coloured wall or patio behind the panel reflects light onto the rear cells, boosting output by 5–15% depending on the surface albedo. A 2024 University of York study found that vertical bifacial panels outperformed tilted monofacial panels by up to 27% during early morning hours, with white gravel beneath boosting albedo further. Bifacial panels on a white-rendered boundary wall can outperform standard panels in the same position.
Connecting Wall Panels to Your System
The most important rule: do not mix wall panels into an existing roof string facing a different direction. The mismatch in irradiance will drag the entire string down to the level of the weakest panel. Instead:
- Use a spare MPPT input on your existing inverter (most hybrid inverters have two).
- Add a microinverter per wall panel for independent operation.
- If using optimisers, ensure the orientation difference is small (within 15–20°). Larger gaps overwhelm most optimisers.
For a detailed walkthrough of wiring options, see our guide to connecting solar panels.
G98 or G99: Which Side of the Threshold Are You On?
Adding wall panels usually pushes a DIY build into new regulatory territory. G98 covers single-phase systems up to 3.68 kW per phase: you self-certify and give your DNO 28 days’ notice after commissioning. G99 applies above that threshold, or to any three-phase install: full application, expect a two to six month turnaround, and the DNO can impose export limits as part of the connection offer.
The combined export capacity is what counts, not each array in isolation. If your existing 3.5 kW roof array plus four new 400 W wall panels puts you at 5.1 kW total, you are in G99 territory even if the wall panels are on their own MPPT. Check the current ENA rules in Engineering Recommendation G98 and G99. My homeowner’s DNO registration guide walks through the paperwork.
MCS, SEG, and DIY Wall Panels
One thing to understand before you order panels: adding DIY wall panels to an existing MCS-certified system breaks that certification. Without an active MCS cert, the whole installation drops out of Smart Export Guarantee eligibility. You cannot export-meter half a system.
To bring a DIY install back under MCS, you need an MCS-accredited installer willing to inspect, sign off, and take over the certification. Not every installer offers that service, and the ones that do typically charge £500 to £1,500. The trade-off is real: 290 kWh per year per panel exported at 15p works out at roughly £44 of lost SEG income per wall panel per year. Run the payback maths on the MCS upgrade before you start drilling.
Disadvantages of vertical solar panels
Wall mounting is not a free win. Before you drill:
- Around 30% lower annual output than an optimally tilted roof panel of the same size and orientation, based on PVGIS SARAH-3 data for UK sites.
- String mismatch risk if you combine a wall panel with a roof array on the same MPPT. The wall panel sees different irradiance, so either use a separate MPPT input or fit microinverters.
- 200mm protrusion cap under UK permitted development (and often tighter under Article 4 directions). Measure from the render or brick face, not the batten line.
- Wind loading is harder than on a pitched roof. A vertical panel acts like a sail in storm gusts. Use mechanical fixings rated for BS EN 1991-1-4 wind zones, not just resin-only fixings.
- Moisture bridging risk in wet climates if penetrations are not properly sealed. Any hole through a cavity wall is a potential rain path.
Is Wall Mounting Right for You?
Wall-mounted solar panels are not a gimmick. They produce real energy — roughly 290 kWh per year per 400 W panel at 90°, or up to 330 kWh if you can tilt to 80°. They capture winter sun better than roof panels, stay cleaner, and open up surfaces that would otherwise go unused. The Unistrut rail system keeps costs reasonable for a DIY installation.
The key is getting the electrical connection right. Give wall panels their own MPPT input, choose a south-facing wall with minimal shading, and check the 200 mm protrusion rule before you start. If you can tick those boxes, wall panels are a smart addition — especially as a complement to an existing roof array.
Frequently Asked Questions
How much do wall-mounted solar panels produce in the UK?
A south-facing 400 W panel mounted vertically (90°) produces approximately 290 kWh per year in the UK. Tilting it to 80° increases output to around 330 kWh. For comparison, the same panel on a roof at the optimal 35–40° angle produces roughly 400–420 kWh. Wall panels produce less overall but deliver more energy during winter months when electricity demand is highest. You can model this for your exact location using the free PVGIS tool from the European Commission — set the tilt to 90° and compare with 35°.
Do I need planning permission for wall-mounted solar panels?
In most cases, no. Solar panels on house walls are permitted development in England and Wales. The main restrictions are: the panel must not protrude more than 200 mm from the wall, it must not sit above the roof line, and special rules apply in conservation areas, World Heritage Sites, and listed buildings. Always check with your local planning authority before starting work.
Can I add wall panels to my existing solar system?
Yes, but do not connect them to the same string as your roof panels if they face a different direction. Use a spare MPPT input on your inverter or add a microinverter for the wall panels. This lets each group of panels operate independently at their optimal voltage. You will also need to notify your DNO if you are increasing total system capacity. If you want the work done professionally, look for an MCS-certified installer who can ensure compliance with the MIS 3002 installation standard.
What is the best wall for solar panels?
A south-facing wall with no shading from trees, neighbouring buildings, or roof overhangs. The wall should be solid brick, block, or concrete — not timber frame or thin cladding. South-east and south-west walls also work well. East or west walls produce noticeably less. North-facing walls are not viable in the UK.
Are wall-mounted solar panels worth it?
If a good roof position is available, roof mounting gives better annual output. But wall panels are absolutely worth it when your roof is unsuitable, full, or shaded. They also complement roof panels by boosting winter generation. At current panel prices (£75–£125 per panel), the investment pays back within 5–7 years even at the lower vertical output. See our full analysis in are solar panels worth it in 2026.
