Introduction
Are you thinking about DIY solar? You’re not alone. With rising energy costs and increasing awareness of renewable energy, many homeowners are exploring the benefits of DIY solar installations. In this article, we’ll walk you through my experience installing solar panels on my garage roof. We’ll cover everything from selecting the right components to registering your system legally in the UK. Whether you’re a seasoned DIYer or just starting, this guide aims to make your solar journey as smooth as possible.
Why DIY Solar?
Solar energy offers many benefits—reduced electricity bills, lower carbon footprint, and even the potential to earn money by exporting excess energy back to the grid. However, professional installations can be costly. By opting for a DIY approach, you can significantly reduce expenses while gaining a deeper understanding of how your system works.
Choosing the Right Location: House vs. Garage Roof
Initially, I considered installing solar panels on my house roof. However, the complexity and risks involved — like potential roof damage and the need for specialized equipment— made me reconsider.
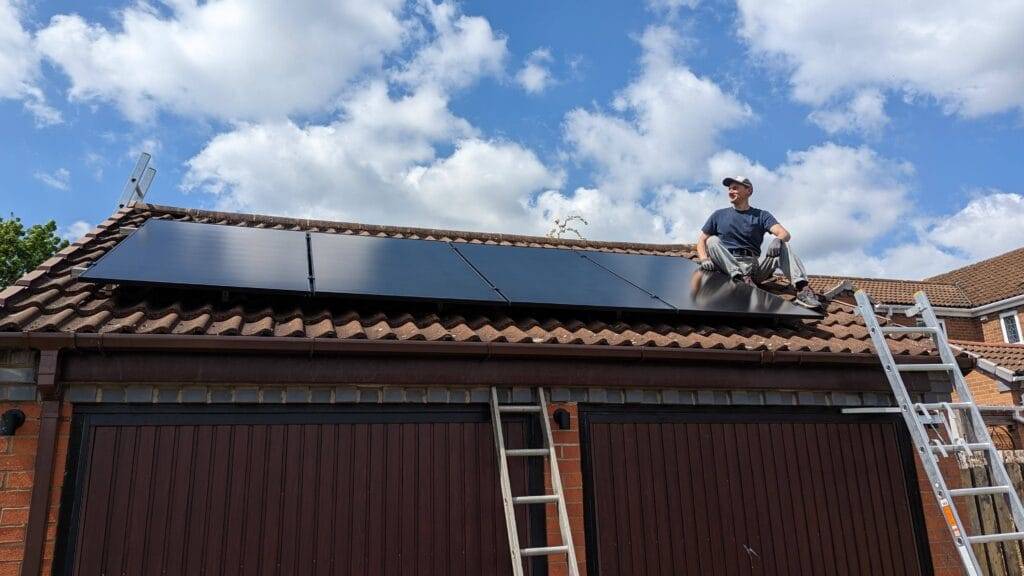
Why the Garage Roof?
- Accessibility: Easier and safer to work on compared to a house roof.
- Cost-Effective: Eliminated the need for professional roofers, keeping costs low.
- Sufficient Space: Provided ample area for the number of panels I wanted to install.
Selecting Components for Your Solar Energy System
Here’s a breakdown of the main components I used:
- Solar Panels: Nine panels split between the east and west sides of the roof.
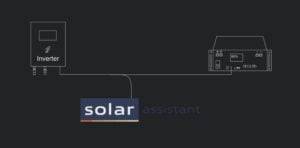
- Inverter: A 3.6 kW hybrid solar inverter handles solar input and battery storage.
- Battery: 10 kWh of storage capacity for energy usage during non-sunny periods.
Preparing Your Roof: Avoiding Damage and Finding Spare Tiles
One of my biggest concerns was the possibility of damaging the roof tiles during installation.
Tips to Avoid Roof Damage
- Source Spare Tiles: Find matching tiles in case any get damaged.
- Identify Tile Type: Use local resources to identify and source the exact tiles.
How I Found Spare Tiles
- Join Local Roofing Groups: I joined a Facebook roofers group where professionals helped me identify my tile type and offered spare tiles.
- Visit Reclamation Yards: These places sell single tiles at affordable prices.
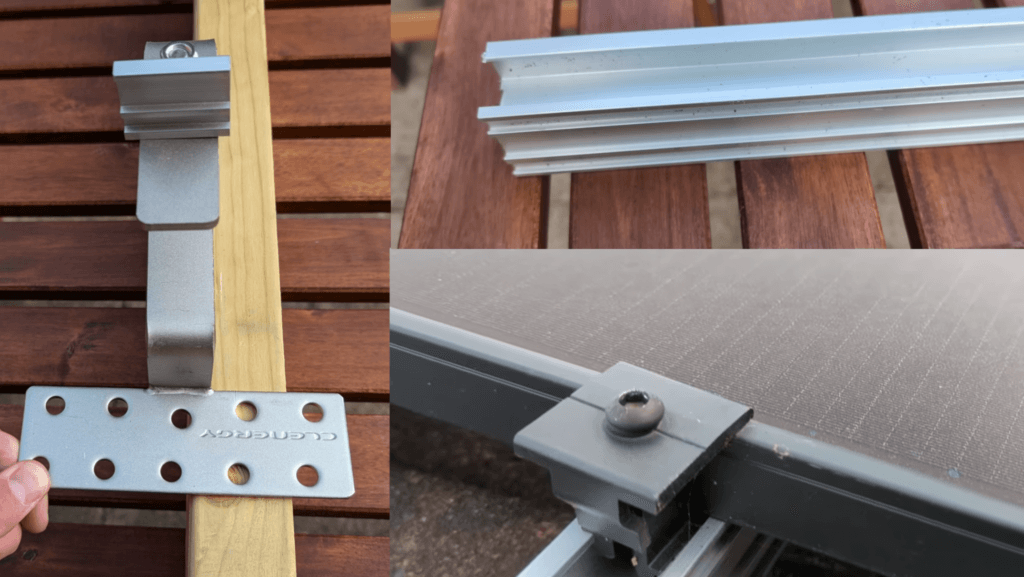
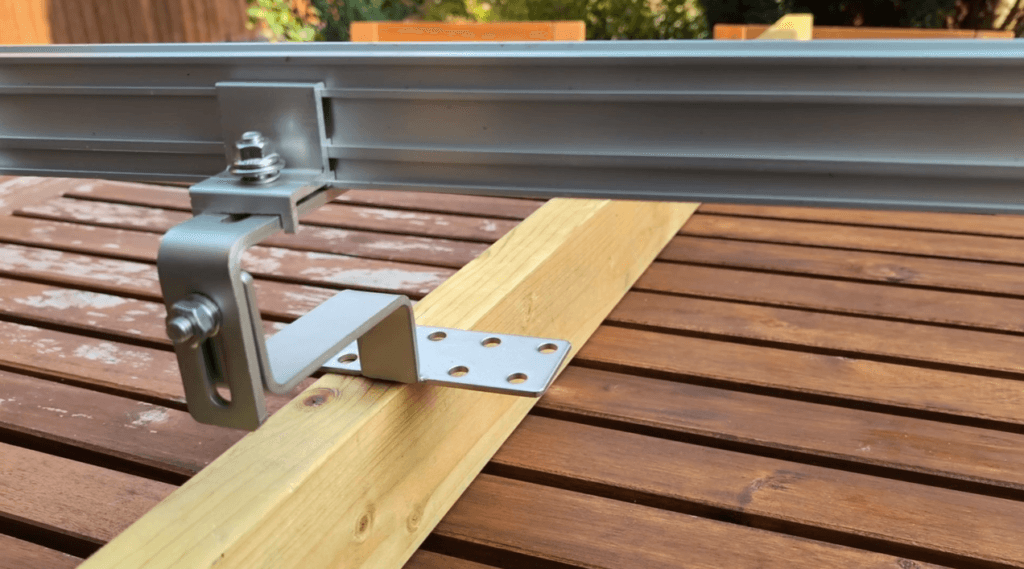
Mounting Equipment Explained
Understanding the mounting system is crucial for a successful installation.
Key Components
- Roof Hooks: Attach directly to the roof rafters, supporting the entire system.
- Rails: Aluminum structures where the solar panels rest.
- Clips: Secure the panels to the rails.
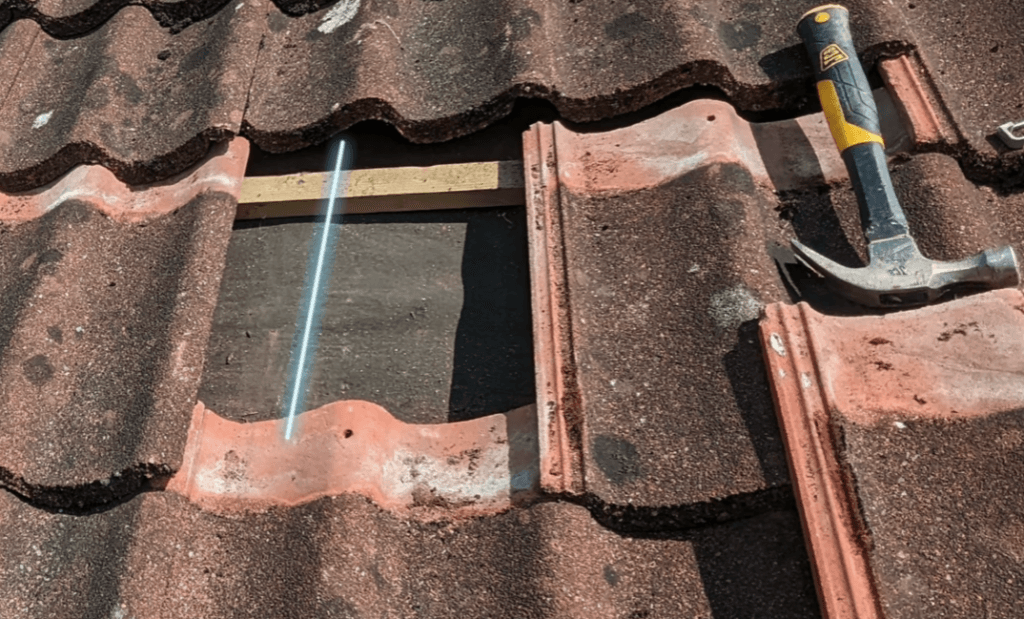
Installing the Roof Hooks
Step-by-Step Guide
- Locate Rafters: Remove a tile to find the roof rafter beneath the membrane.
- Attach Roof Hooks: Use pre-drilled holes to align and secure the hook to the rafter.
- Seal Penetrations: Apply all-weather silicone to seal any holes in the membrane.
- Modify Tiles: Grind tiles to create a channel for the roof hook, ensuring tiles fit snugly afterwards.

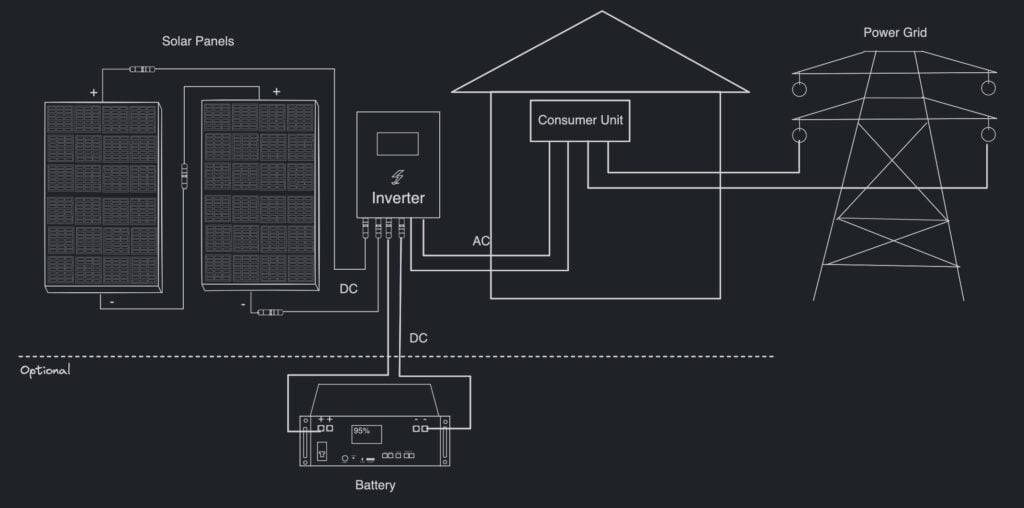
Connecting the Inverter to Your Home
Since I was installing a grid-tied inverter, proper connection to my home’s electrical system was essential.
Professional Assistance
- Hire an Electrician: I enlisted a certified electrician to install a new AC connection between the main consumer unit and the garage.
- Dedicated Circuit: The inverter was connected on a dedicated circuit, complying with UK regulations.
Important Note: In the UK, installing new electrical circuits is notifiable work requiring certification.
Registering Your DIY Solar Installation in the UK
Registering your system with the appropriate authorities is crucial to ensure legality and safety.
Steps for Registration
- Identify Your DNO: Find your local Distribution Network Operator.
- Fill Out the Appropriate Form:
- G98 Form: For systems up to 3.68 kW.
- G99 Form: For systems larger than 3.68 kW.
- Gather Required Information:
- MPAN: Your Meter Point Administration Number (found on your electricity bill or via the National Grid website).
- ENA Device Reference Number: Found on the Energy Network Association’s type test register.
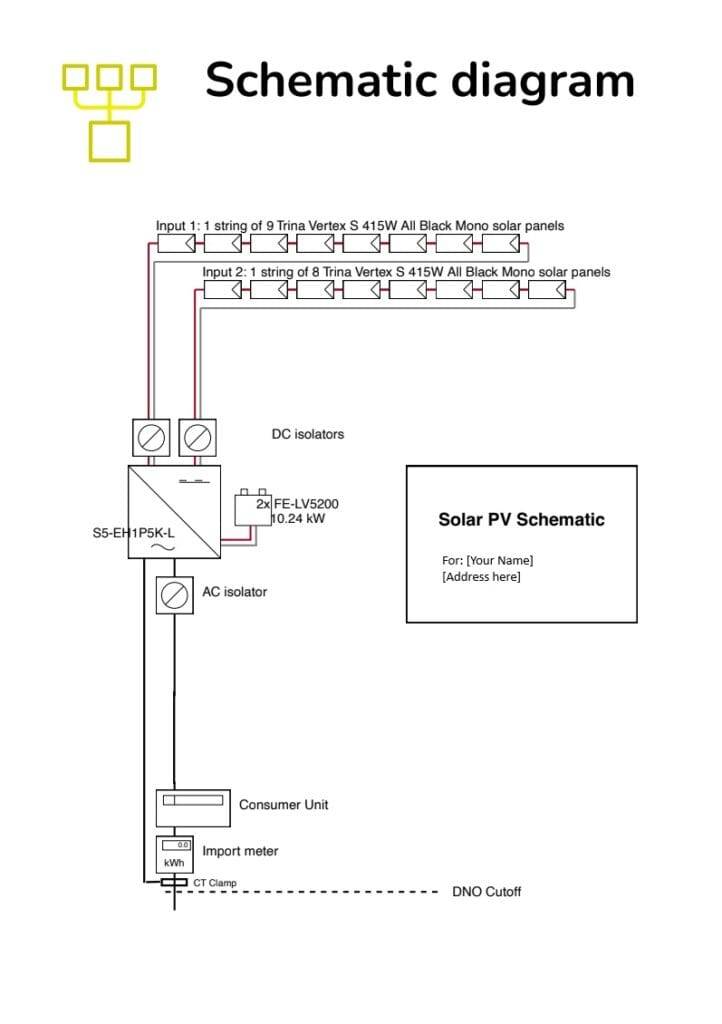
Submission
- Email Documents: Send the completed form and a schematic diagram of your installation to the DNO within 28 days of commissioning.
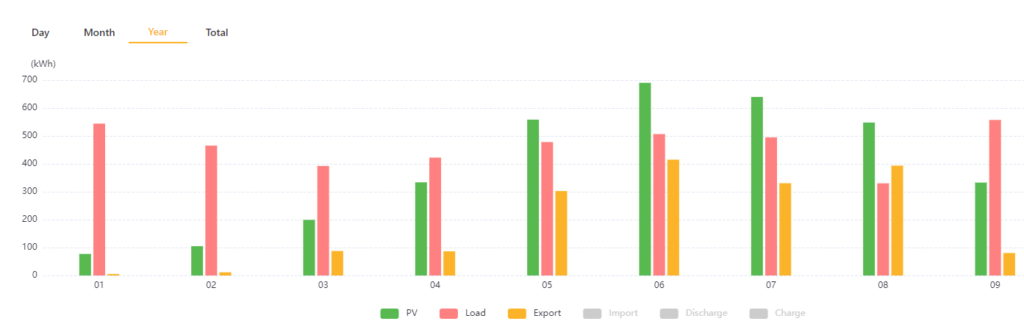
Performance and Stats: One Year Later
After a full year of operation, the results have been impressive.
2023 Highlights
- Generation: Approximately 1,400 kWh.
- Limitations: Excess energy couldn’t be fed back to the grid without export registration.
2024 Improvements
- Export Registration: Enabled in November 2023, allowing full utilization of generated energy.
- System Expansion: Doubled the number of panels from May 2024 onwards.
- Energy Independence: From April onwards, enough electricity was generated to offset daytime usage completely.
Table: Monthly Energy Generation and Consumption
| Month | Generation (kWh) | Consumption (kWh) | Net Export (kWh) |
|---|---|---|---|
| January | 100 | 200 | -100 |
| February | 150 | 180 | -30 |
| March | 200 | 160 | +40 |
| April | 250 | 150 | +100 |
| May onwards | 500 | 150 | +350 |
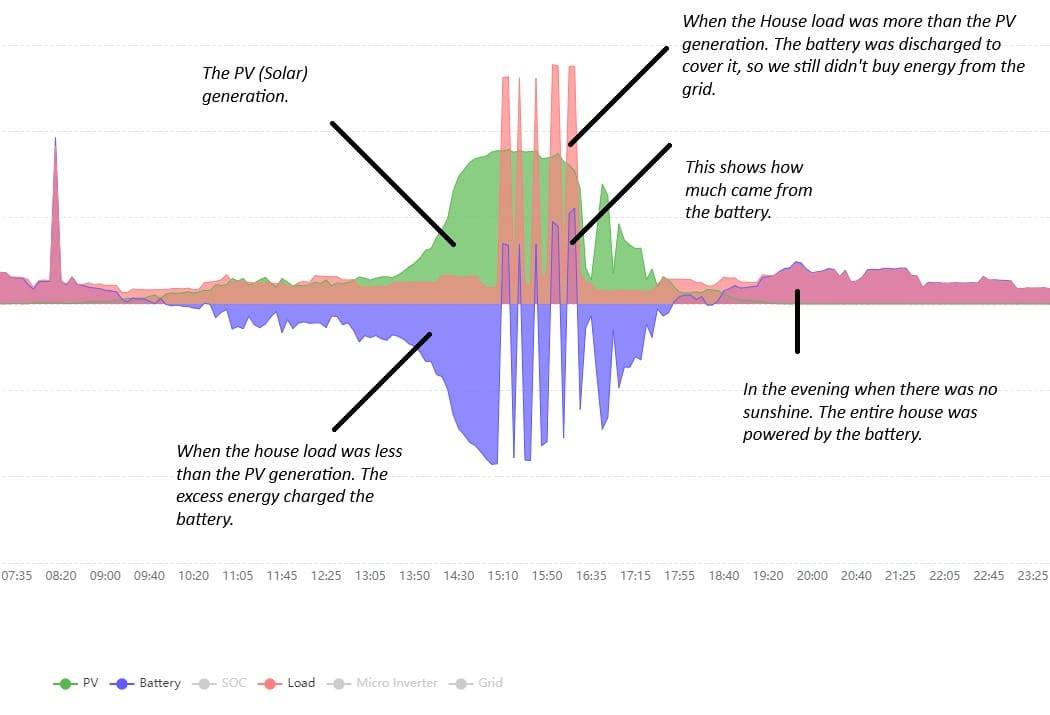
The Importance of Battery Storage
If you’re considering a solar installation, I can’t stress enough the value of including a battery.
Benefits of Battery Storage
- Energy Flexibility: Store excess energy for use during peak hours or nighttime.
- Cost Savings: Charge the battery during off-peak hours with cheaper electricity rates.
- Grid Independence: Reduce reliance on the grid, increasing energy security.
Final Thoughts
Embarking on a DIY solar installation has been a rewarding experience. Not only have I reduced my electricity bills, but I’ve also contributed to a more sustainable future.
Key Takeaways
- Planning is Crucial: Proper research and preparation can prevent potential issues.
- Community Resources: Don’t underestimate the help you can get from local groups and professionals.
- Legal Compliance: Ensure your installation meets all regulatory requirements for safety and legality.
- Battery is King: Investing in a battery can significantly enhance the efficiency and savings of your system.
Conclusion
DIY solar installation is feasible and an empowering step toward energy independence. With careful planning and the right resources, you can enjoy solar energy’s financial and environmental benefits without the hefty price tag of professional installation. Before you start, check our UK Solar Panel Grants and Incentives 2026 guide for schemes that can reduce your upfront costs.