Achieve surprisingly short ROI with solar energy from your shed’s roof. A guide on placing solar panels on your shed or garage and saving money from your bills.

Unlock the hidden potential in your garden: your everyday shed or garage could be your first step into the world of cheap solar energy.
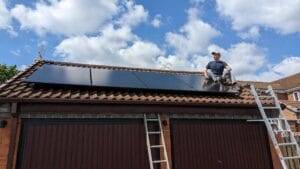
I DIY-installed solar panels on my garage roof in May 2023, and it has been such a success that I intend to build a gazebo where I will install more panels. Let me tell you how a few hours of research and DIY can put your shed or garage to work for your home budget by generating cheap energy.
In this article:
Solar Panels on Your Shed or Garage Roof, How Does it Work?
The premise is simple. Install a few solar panels on the roof of your garage or shed, add an inverter and connect the system to your home. Naturally, there is limited space on these roofs, but this scales down the effort required to install the system. Moreover, even a few panels can make a difference, and make your effort worthwhile.

Electricity is dangerous and can kill, always consult a professional if you are not fully confident in your skills and knowledge of electric safety )
Installing Panels on Your Garage or Shed is Easier
Installing solar panels on the roof of your garage or shed is significantly smaller effort compared to installing on the roof of your main house. This is because:
- you don’t need to lift panels high up so no scaffolding required
- you’re working with smaller-scale system so components are cheaper
The greatest advantage from DIY point is that you can start small and learn from experience. Additionally, you benefit from:
- working at safer heights
- smaller exposure to risk of property damage in case of faults, sheds cost less than houses.
Once you install the solar panels on your shed or garage roof you need to connect them to your home. Let’s explore how this is done.
Wiring a Shed, Summer House or Garage for Solar Panels
The solar panels on your shed or summer house’s roof need to be connected to an inverter, which, in turn, needs to be connected to your home’s consumer unit on a dedicated circuit.
When making new connections, always prefer to run AC instead of DC. Unless you are set on connecting your shed’s solar panels to an existing inverter elsewhere on your property, there is little value in running DC.
AC is always the winning choice. This is because AC is both cheaper and safer to run. Its high voltage allows for efficient transportation in relatively small cross-section cables, and its alternating nature makes it easier to secure against sparks.
What Are The Benefits of Using AC Over DC For Garage Solar?
Why invest into components and effort to convert the DC energy from the panels into AC? It is an important question. Especially for those looking for an off-grid solution in an outbuilding.
The simple answer is that it is worth it. The benefits of working wight AC and maintaining it in the long run outweigh the initial saving you might gain if you connect to DC directly.
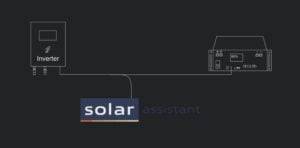
Illustrative Diagram of Solar Panels Connecting to Your House

The diagram involves the most simplistic representation of a viable and safe system. Solar panels terminated into a DC isolator and, from there, connected to the inverter. The AC from the inverter is terminated into an AC isolator, and from there, it goes to your consumer unit.
Practical Tip:
The isolators on the diagram are essential for your safety when performing maintenance or switching off your solar energy system without going to your consumer unit.
Wiring a Shed or Detached Garage is Notifiable Under Part P
Wiring a shed, summer house or detached garage is typically notifiable under Part P of the Building Regulations , especially if it involves installing new circuits or significant alterations to existing ones. This is because sheds are considered outbuildings and fall under the scope of Part P, which covers electrical installations in domestic premises and associated buildings like sheds, garages, and greenhouses.

What Can 4 Solar Panels Power in Your Home?
The solar panels you will be looking at are around 400W in most cases. With a total of 1600W, you will take care of the base load of your home and still have some energy to spare. If you can’t fit as many as four panels and only have space for one or 2, that will likely take care of your base load but is unlikely to get beyond that.
What Does Base Load of a Home Mean?
Base load is the electricity consumption from appliances and devices constantly switched on, such as fridges, chargers, TVs, laptops, routers, air filters, etc. When added up, these can consume a few kWh a day, which at the current prices will cost you between £100 and £200 a year.
Is it Worth Installing Solar Panels on the Shed or Garage?
Yes, these will pay for themselves in a few years. Let’s work through two hypothetical installations to see how much it costs to:
- buy the components and accessories
- hire an electrician if required
- compare that to the benefit we can expect from our system.
The base costs of the system
| Item | Price – 2024 |
|---|---|
| Solar Panels (4 x 435w) | £280 |
| Rails and hooks for the roof | £50 |
| PV Cables | £30 |
| MC4 Connectors | £15 |
| DC Isolator | £20 |
| AC Isolator | £20 |
| Total | £415 |
Contractor costs may be required, but there is also a chance you don’t need them.
If the AC cables running from your house to the shed are only sized for a single light, then the power your solar energy system will put through them may exceed their rated current.
If your shed or garage is not connected to a separate circuit in your consumer unit, you will need to install one for the inverter.
This price of this service ranges from £250 in common cases to unknown values based on how far away is your shed or garage and other complications such as physical obstructions around the inverter or the distance to it.
Panels on the Shed For as Little Cost as Possible – String Inverter
You already have lights in the garage or shed, so connecting your solar system to your home can use the existing wiring.
Add a small string inverter to convert the DC from your solar panels. A 1.5kW Growatt single-phase inverter will set you back £200, and some deals go as low as £160.
With this budget option, you are hypothetically losing 150W from your peak production, but this loss is mitigated by the rarity of your system producing at 100% of its rated capacity. If that bothers you, the next best alternative is a 2kW Growatt MIC 2000TL, which will set you back £273
The total spend for a cost-optimised solar shed or garage:
| Outcome | Price |
|---|---|
| 1.5kW inverter and no new circuit required | £751 |
| 1.5kW inverter and new circuit required | £1001 |
Solar Shed with Batteries
A 2.4kWh battery stores enough energy to cover your base load during the dark hours and fits with the chosen inverter costs around £700. If we take the inverter costs described above and add the battery cost, we get:
| Outcome | Price |
|---|---|
| 1.5kW inverter with battery and no new circuit required | £1451 |
| 1.5kW inverter and new circuit required | £1701 |
Return on investment (ROI) for each option
Let’s consider a house with a base load of around 3kWh daily. This is 1095kWh a year. We place four panels on a shed, two east-facing and two west-facing. We can expect to get 695kW from the west and 708kW from the east. The shed is based in England. Here, we can expect around 4,380 hours of daylight. We can subtract 1.5 hours before sunset and after sunrise as low productive time. We get 3650h of base load covered.
Base load 365 x 3 = 1095kWh
Hours in a year = 8760
Base load per hour = 1095 / 8760 = 0.125kWh
ROI on a Cost Optimised Solar Shed or Garage
An important detail regarding this system is that it may take longer to recoup the investment and start reaping benefits. This is determined by how much energy you generate can be utilised. You only benefit from the energy you consume. For example, if no one is in your home during the day, the solar panels will only work for the base load. Even if you are at home, cloudy days will still impair your energy production and fully utilising it will mean your home always consumes more than the system generates.
Total base load taken care of = 3650 x 0.125 = 456kWh
Total cost returned = £118 ( 456 x £0.26 )
| Outcome | Price | ROI |
|---|---|---|
| 1.5kW inverter and no new circuit required | £751 | 6 years 4 months |
| 1.5kW inverter and new circuit required | £1001 | 8 years 5 months |
Please note that this is a conservative calculation, and with better utilisation of energy during the light hours of the day, the ROI has a significant margin for improvement.
ROI on a Solar Shed or Garage with Battery Storage
In this case, we will use the full amount of generated energy in our home. This gives us a potential benefit of
659kWh + 708kWh = 1403kWh
1403kWh x £0.26 = £364 savings per year
| Outcome | Price | ROI |
|---|---|---|
| 1.5kW inverter with battery and no new circuit required | £1451 | 4 years |
| 1.5kW inverter and new circuit required | £1701 | 4 years 7 months |
Conclusion
This guide demonstrates that converting your shed or garage into a solar energy hub is feasible and financially rewarding. Sheds and garages are a great opportunity for DIY-ers as the smaller scale system offer relatively comfortable margins for error. With a modest initial investment, you can achieve a return on investment in as little as four years. By optimising your system, you can significantly cut down your energy bills and contribute to a more sustainable future.


