
Your shed, garage, or summer house roof is unused space that could generate electricity. First-screen feasibility: unshaded roof, a lawful hardwired connection (not a socket plug-in), a cable route you can protect, and inverter capacity that still fits under G98 (3.68kW AC) or a planned G99 upgrade. Plug-in kits that connect straight into a wall socket have been legal in Great Britain since 27 August 2026, but only for a model listed Compliant on the ENA register, one per household, and a shed socket on a spur is not automatically a suitable circuit.
If you want a standalone kit to power the shed itself, use my off-grid shed solar kit guide.
Feasibility: Typical Shed kWp vs G98 Headroom
G98 on single phase caps inverter AC capacity at 3.68kW, not the panel nameplate total. A small shed array often sits well inside that headroom, which is why garage and shed systems are a practical first step. For the wider limits, see maximum solar panels allowed in the UK. If you already have a house array, the second system is assessed on combined capacity: two separate solar systems on one property.
| Outbuilding layout | Typical DC array | Example inverter AC | G98 headroom note |
|---|---|---|---|
| 1-2 panels on a small shed | 0.4-0.9kWp | 0.6-1.5kW | Plenty of headroom if this is the only inverter on site |
| 3-4 panels on a garage | 1.2-1.8kWp | 1.5-2.0kW | Common first DIY size; still well under 3.68kW AC |
| 6-8 panels on a large garage or summer house | 2.4-3.6kWp | 2.5-3.6kW | Can remain G98 if AC stays at or under 3.68kW and no other export inverter is already maxing the site |
| Adding a shed array next to an existing 3.68kW house system | any extra DC | combined AC above 3.68kW | Usually needs G99 before connection; design the two systems together |
Cable-Run Options from Shed to House
How you run the cable decides cost, safety, and whether the job stays simple. Prefer a short AC run from a local inverter back to a dedicated consumer-unit circuit whenever you can.
| Option | When to use it | Watch-outs |
|---|---|---|
| AC from shed inverter to house consumer unit | Default for a new outbuilding array | SWA or other protected outdoor cable, isolation at both ends, dedicated circuit, Part P notification for the new work |
| DC string back to a house hybrid inverter | Only if a spare MPPT is free and the DC route is short and protected | DC faults are harder to clear; long DC runs are rarely worth it for a small shed |
| Microinverters on the shed, AC home | Mixed orientations, expansion one panel at a time | Still needs a lawful AC connection, not a 13A socket plug-in |
| Power the summer house locally | Daytime office, gym, or studio load in the outbuilding | Empty rooms waste generation; feed the house instead if the building is rarely used |
Garden walls and fence mounts are covered in the wall-mounting guide. Most shed and garage roofs are low enough that a tower is enough, but house eaves still need proper access planning: see scaffolding for solar panel installation.
A shed or garage can host real generation: your everyday shed or garage could be your first step into the world of cheap solar energy.
I DIY-installed solar panels on my garage roof in May 2023, and it has been such a success that I intend to build a gazebo where I will install more panels. Let me tell you how a few hours of research and DIY can put your shed or garage to work for your home budget by generating cheap energy.
Plug-in Solar for Sheds: Legal Since 27 August 2026, With Conditions
If all you want is to cut some bills from your shed roof, the lawful option today is a small hardwired system: a panel or two and an inverter, wired to its own breaker in your consumer unit by a registered electrician, and notified to your network operator under G98. The rest of this article covers that approach.
Since 27 August 2026 you can legally plug a solar kit into a socket, including one in a shed, if three things are true. The exact model is listed Compliant on the ENA register (70 kits were listed on 22 September 2026, sold by Screwfix, City Plumbing and Argos from £336). It is the only plug-in device on the property. And the socket sits on a socket circuit protected by a Type A, F or B RCD that works in both directions, which the home suitability check shows you how to confirm. A shed fed by a long spur off the house ring, or through an extension lead, does not qualify. For anything that fails those tests, the hardwired route above is still the legal way to connect shed solar to your home.
Here is a realistic estimate for a plug-in kit rather than a marketing figure: an 800W kit produces roughly 650-800 kWh a year. Without a battery, you only benefit from what you use while it is generating, so self-consumption is typically 25-40%. At the current price cap (about 26p/kWh), that is an estimated £40-85 a year in savings, not the 2-4 year payback some sellers imply. A realistic payback on the £599 Argos kit is 7 to 14 years.
A few things to check before buying:
- Socket connection has been legal in Great Britain since 27 August 2026, but only for a kit on the ENA register. Northern Ireland is not covered
- The government’s product specification (an 800W limit, a factory-fitted fused plug, automatic shutdown when unplugged) is written into the law, and the ENA register is the public list of kits that meet it. A kit that is not on the register has no socket route, however it is advertised
- No full British Standard exists yet. The first compliant kits went on sale at Argos in late August 2026, and both Argos and UKSOL say they are not suitable for balconies
Full details on the regulations and which kits are available: UK plug-in solar rules and our buying guide (includes an interactive kit builder).
Solar Panels on Your Shed or Garage Roof, How Does it Work?
The premise is simple. Install a few solar panels on the roof of your garage or shed, add an inverter and connect the system to your home. Naturally, there is limited space on these roofs, but this scales down the effort required to install the system. Moreover, even a few panels can make a difference, and make your effort worthwhile.

Electricity is dangerous and can kill, always consult a professional if you are not fully confident in your skills and knowledge of electrical safety)
Installing Panels on Your Garage or Shed is Easier
Installing solar panels on the roof of your garage or shed is significantly smaller effort compared to installing on the roof of your main house. This is because:
- you don’t need to lift panels high up so no scaffolding required
- you’re working with smaller-scale system so components are cheaper
The greatest advantage from DIY point is that you can start small and learn from experience. Additionally, you benefit from:
- working at safer heights
- smaller exposure to risk of property damage in case of faults, sheds cost less than houses.
Once you install the solar panels on your shed or garage roof you need to connect them to your home. Let’s explore how this is done.
Wiring a Shed, Summer House or Garage for Solar Panels
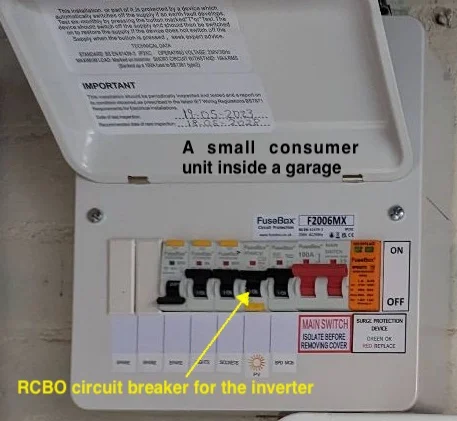
The solar panels on your shed or summer house’s roof need to be connected to an inverter, which, in turn, needs to be connected to your home’s consumer unit on a dedicated circuit.
When making new connections, always prefer to run AC instead of DC. Unless you are set on connecting your shed’s solar panels to an existing inverter elsewhere on your property, there is little value in running DC.
AC is always the winning choice. This is because AC is both cheaper and safer to run. Its high voltage allows for efficient transportation in relatively small cross-section cables, and its alternating nature makes it easier to secure against sparks.
What Are The Benefits of Using AC Over DC For Garage Solar?
Why invest into components and effort to convert the DC energy from the panels into AC? It is an important question. Especially for those looking for an off-grid solution in an outbuilding.
The simple answer is that it is worth it. The benefits of working with AC and maintaining it in the long run outweigh the initial saving you might gain if you connect to DC directly.
Illustrative Diagram of Solar Panels Connecting to Your House
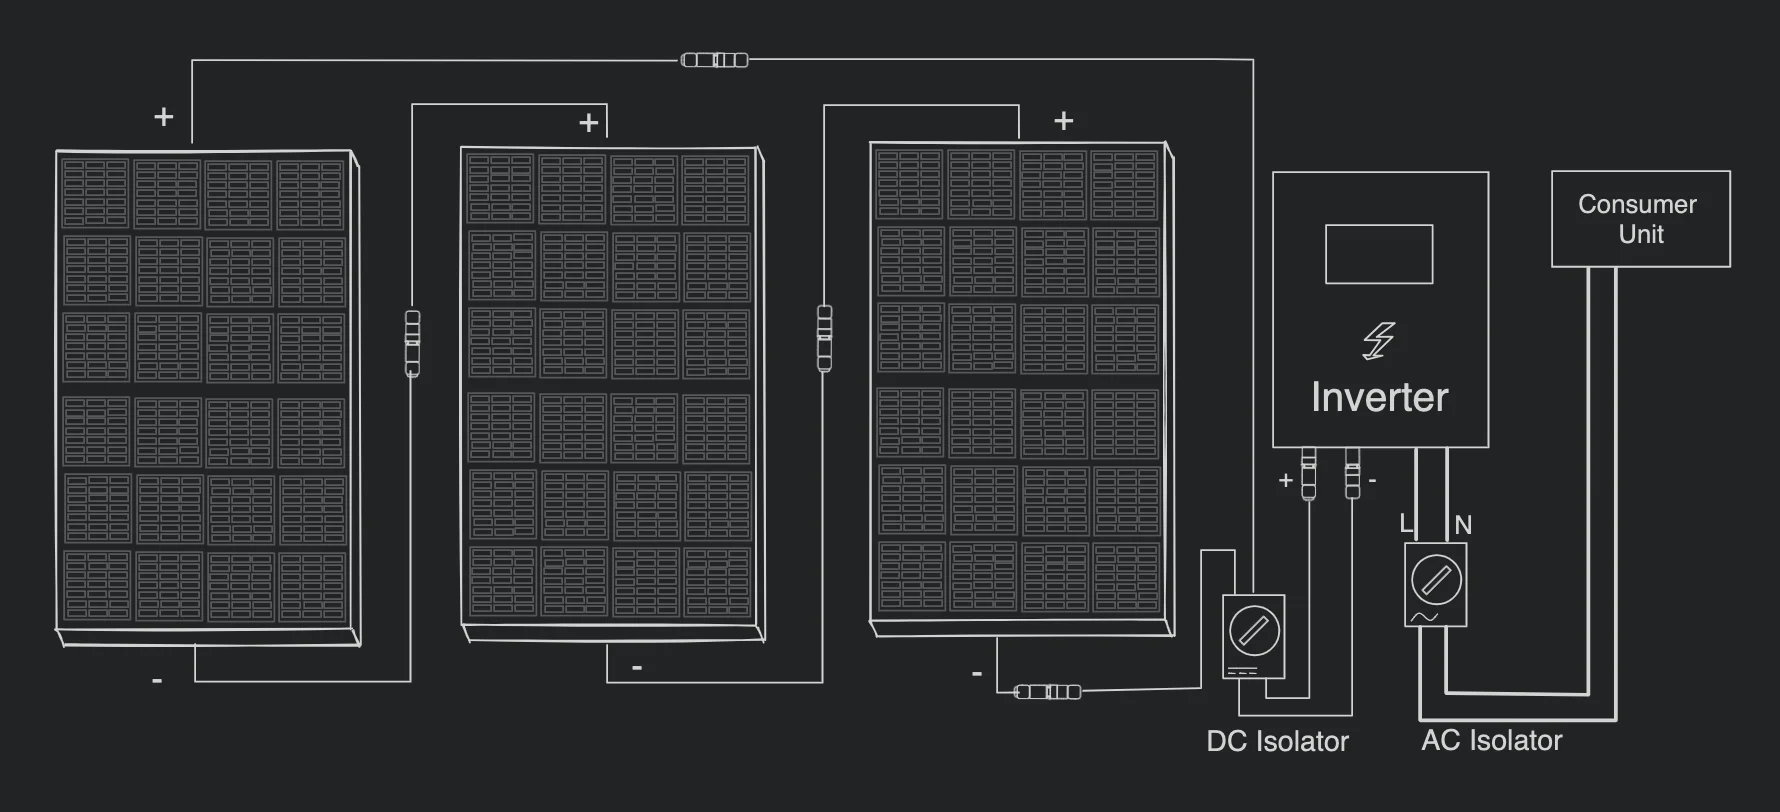
The diagram involves the most simplistic representation of a viable and safe system. Solar panels terminated into a DC isolator and, from there, connected to the inverter. The AC from the inverter is terminated into an AC isolator, and from there, it goes to your consumer unit.
Practical Tip:
The isolators on the diagram are essential for your safety when performing maintenance or switching off your solar energy system without going to your consumer unit.
Wiring a Shed or Detached Garage is Notifiable Under Part P
Wiring a shed, summer house or detached garage is typically notifiable under Part P of the Building Regulations , especially if it involves installing new circuits or significant alterations to existing ones. This is because sheds are considered outbuildings and fall under the scope of Part P, which covers electrical installations in domestic premises and associated buildings like sheds, garages, and greenhouses.
From April 2026, BS 7671 Amendment 4 updates wiring standards for electrical installations. The Part P notification requirement still applies for new shed and garage circuits, so check with your local authority building control if you are in any doubt.
Solar Panels for a Summer House
A summer house changes the maths compared with a shed or a garage. If you use it as a home office, a gym or a studio, it draws a real load through the day: lighting, a laptop and monitor, a heater or a fan. That load lines up with the hours your panels generate, so you consume the electricity as you make it instead of exporting it for a few pence. A shed used a handful of weekends a year cannot do that, which is why its payback in the calculations above leans on a battery.
The building itself is the catch. Many garden rooms have a flat felt or EPDM roof rather than a pitched one, which is harder to mount panels on at a useful angle, and the orientation is fixed by where the summer house sits in your garden, so a south-facing slope is a bonus rather than a given. Look at the roof before you price anything. A shallow or shaded roof may push you towards a small ground-mounted frame beside the building instead of panels on top of it.
Wiring a Summer House Follows the Same Outbuilding Rules
The electrical work is the same as for any detached outbuilding, which the Part P section above covers. A new supply or circuit to a summer house is notifiable under Part P of the Building Regulations in England, so it is either done by a registered electrician who self-certifies the work or notified to building control before it starts. A detached summer house usually takes its feed from the house in steel wire armoured (SWA) cable, with its own means of isolation and often a small consumer unit inside. Your electrician designs that to BS 7671. There is no fixed distance or size that decides it for you, so treat any rule of thumb you read online with caution.
Planning Permission for Panels on a Summer House
For most homes, solar panels on an outbuilding in your garden are permitted development, the same as panels on the house, so you will not need a planning application. The permissions sit under Part 14 of the General Permitted Development Order, and the usual conditions apply: the panels should sit close to the roof, should not stand above the highest part of it, and should be sited to keep the visual impact down. A ground-mounted array has its own separate size limits.
Two situations change that. If your home is listed, you need listed building consent for panels on any building in its grounds, including a summer house. If you are in a conservation area or under an Article 4 direction, permitted development rights can be restricted, so panels facing a road may need a full application. Check the rules for your address before you buy. The Planning Portal sets out the current conditions, and your local planning authority will confirm what applies to you.
Power the Summer House Directly, or Feed the House?
There are two ways to wire it, and the right one depends on when you use the building. If the summer house has its own steady daytime load, an office you sit in on weekdays for example, a small array and inverter feeding its own circuit is the simple choice. You use what you generate on the spot, the cable run stays short, and the system is self-contained.
If the building is only used occasionally, its roof is really just extra generation. Then it makes more sense to route the output back to your house consumer unit, the AC approach described earlier, so your whole home base load can soak up the energy rather than waste it in an empty room. That run has to be sized and protected for power flowing back towards the house, and your network operator notification (G98 or G99) is handled at the main house connection. A battery works with either approach when your generation and your use do not line up.
What Can 4 Solar Panels Power in Your Home?
The solar panels you will be looking at are around 400W in most cases. With a total of 1600W, you will take care of the base load of your home and still have some energy to spare. If you can’t fit as many as four panels and only have space for one or 2, that will likely take care of your base load but is unlikely to get beyond that.
What Does Base Load of a Home Mean?
Base load is the electricity consumption from appliances and devices constantly switched on, such as fridges, chargers, TVs, laptops, routers, air filters, etc. When added up, these can consume a few kWh a day, which at the current prices will cost you between £100 and £200 a year.
Is it Worth Installing Solar Panels on the Shed or Garage?
Yes, these will pay for themselves in a few years. Let’s work through two hypothetical installations to see how much it costs to:
- buy the components and accessories
- hire an electrician if required
- compare that to the benefit we can expect from our system.
The base costs of the system
| Item | Price – 2026 |
|---|---|
| Solar Panels (4 x 435W) | £240 |
| Rails and hooks for the roof | £50 |
| PV Cables | £30 |
| MC4 Connectors | £15 |
| DC Isolator | £20 |
| AC Isolator | £20 |
| Total | £375 |
Note: panel prices are based on early 2026 UK retail. China removed its 9% export rebate on solar panels on 1 April 2026 and prices are expected to rise 8-15% over the next 6-12 months. If you are planning to buy, current stock is likely the cheapest window. See our solar panel prices tracker for the latest.
Contractor costs may be required, but there is also a chance you don’t need them.
If the AC cables running from your house to the shed are only sized for a single light, then the power your solar energy system will put through them may exceed their rated current.
If your shed or garage is not connected to a separate circuit in your consumer unit, you will need to install one for the inverter.
The price of this service ranges from £250 in common cases to unknown values based on how far away is your shed or garage and other complications such as physical obstructions around the inverter or the distance to it.
Panels on the Shed For as Little Cost as Possible – String Inverter
You already have lights in the garage or shed, so connecting your solar system to your home can use the existing wiring.
Add a small string inverter to convert the DC from your solar panels. A 1.5kW Growatt single-phase inverter will set you back £180, and some deals go as low as £150.
With this budget option, you are hypothetically losing 150W from your peak production, but this loss is mitigated by the rarity of your system producing at 100% of its rated capacity. If that bothers you, the next best alternative is a 2kW Growatt MIC 2000TL, which will set you back £250
The total spend for a cost-optimised solar shed or garage:
| Outcome | Price |
|---|---|
| 1.5kW inverter and no new circuit required | £555 |
| 1.5kW inverter and new circuit required | £805 |
Solar Shed with Batteries
A 2.4kWh battery stores enough energy to cover your base load during the dark hours and fits with the chosen inverter costs around £600. If we take the inverter costs described above and add the battery cost, we get:
| Outcome | Price |
|---|---|
| 1.5kW inverter with battery and no new circuit required | £1155 |
| 1.5kW inverter and new circuit required | £1405 |
Return on investment (ROI) for each option
Let’s consider a house with a base load of around 3kWh daily. This is 1095kWh a year. We place four panels on a shed, two east-facing and two west-facing. In the example worksheet, annual generation is about 695 kWh from the west array and 708 kWh from the east array. The shed is based in England. Here, we can expect around 4,380 hours of daylight. We can subtract 1.5 hours before sunset and after sunrise as low productive time. We get 3650h of base load covered.
Base load 365 x 3 = 1095kWh
Hours in a year = 8760
Base load per hour = 1095 / 8760 = 0.125kWh
ROI on a Cost Optimised Solar Shed or Garage
An important detail regarding this system is that it may take longer to recoup the investment and start reaping benefits. This is determined by how much energy you generate can be utilised. You only benefit from the energy you consume. For example, if no one is in your home during the day, the solar panels will only work for the base load. Even if you are at home, cloudy days will still impair your energy production and fully utilising it will mean your home always consumes more than the system generates.
Total base load taken care of = 3650 x 0.125 = 456kWh
Total cost returned = £135 ( 456 x £0.2962 )
| Outcome | Price | ROI |
|---|---|---|
| 1.5kW inverter and no new circuit required | £555 | 4 years 1 month |
| 1.5kW inverter and new circuit required | £805 | 6 years |
Please note that this is a conservative calculation, and with better utilisation of energy during the light hours of the day, the ROI has a significant margin for improvement.
ROI on a Solar Shed or Garage with Battery Storage
In this case, we will use the full amount of generated energy in our home. This gives us a potential benefit of
695 kWh + 708 kWh = 1,403 kWh
1403kWh x £0.2962 = £415 savings per year
| Outcome | Price | ROI |
|---|---|---|
| 1.5kW inverter with battery and no new circuit required | £1155 | 2 years 9 months |
| 1.5kW inverter and new circuit required | £1405 | 3 years 5 months |
Conclusion
This guide demonstrates that converting your shed or garage into a solar energy hub is feasible and financially rewarding. Sheds and garages are a great opportunity for DIY-ers as the smaller scale system offer relatively comfortable margins for error. With a modest initial investment, you can achieve a return on investment in as little as four years. By optimising your system, you can significantly cut down your energy bills and contribute to a more sustainable future.
